Screen recording on an iPhone with sound has become an essential feature for many users. Whether you want to capture gameplay, create tutorials, or save important video calls, this function offers a versatile solution. In this comprehensive guide, Iron Snout will walk you through the process of screen recording on your iPhone with audio, ensuring you can make the most of this powerful tool.
Before you can start recording your screen, you'll need to add the screen recording feature to your Control Center. This process is straightforward and only takes a few moments. Begin by opening the Settings app on your iPhone and scrolling down to find the Control Center option. Tap on it to access the customization menu. Here, you'll see a list of available controls. Look for "Screen Recording" in the "More Controls" section and tap the green plus icon next to it to add it to your Control Center. Once added, you can rearrange its position by dragging it up or down the list.
With the screen recording feature now accessible through your Control Center, you're ready to start capturing your iPhone's display. This setup process is crucial for quick access to the recording function whenever you need it. Remember, you can always remove or rearrange controls in the Control Center to suit your preferences and usage habits.
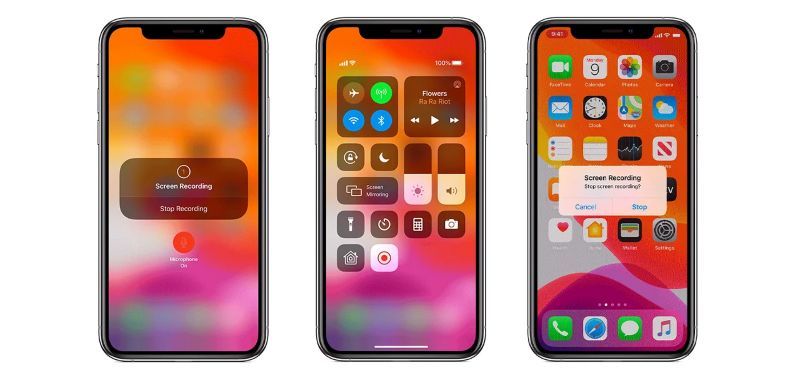
Now that you've set up the screen recording feature, it's time to learn how to use it effectively. To begin a screen recording, swipe down from the top-right corner of your iPhone screen (or up from the bottom on older models) to open the Control Center. Look for the screen recording icon, which resembles a solid circle inside another circle. Tap and hold this icon to reveal additional options. Here, you'll see a microphone icon at the bottom of the screen. Make sure it's turned on (highlighted in red) to include audio in your recording.
Once you've enabled the microphone, simply tap "Start Recording" to begin. Your iPhone will initiate a three-second countdown, giving you time to navigate to the app or screen you want to record. After the countdown, the recording will start automatically. You'll notice a red indicator in the status bar or a red pill-shaped icon (depending on your iPhone model) to show that recording is in progress.
When screen recording on your iPhone, you have the option to capture internal audio from apps or external sound using your device's microphone. Internal audio is great for recording gameplay sounds, music, or app audio. To record internal audio, ensure the microphone is enabled in the screen recording options and that your iPhone's ringer is not on silent mode. For external sound, such as your voice commentary, the microphone will pick up ambient noise. Keep in mind that you can't record both internal and external audio simultaneously in most cases.
If you're playing Iron Snout or any other game while recording, the internal audio will capture the game's sounds perfectly. This feature is particularly useful for creating gameplay tutorials or sharing your high scores with friends. Remember that some apps may restrict audio recording due to copyright issues, so always check the app's policies before sharing your recordings publicly.
After you've finished recording, you might want to edit your video before sharing it. Fortunately, iOS provides built-in tools for basic editing. To stop the recording, tap the red status bar or pill-shaped icon and confirm by tapping "Stop." Your recording will be automatically saved to the Photos app. From there, you can trim the beginning and end of the video, adjust the volume, or add simple effects.
To edit your recording, open the Photos app and select the video you just created. Tap "Edit" in the top-right corner to access the editing tools. Here, you can drag the yellow handles at the beginning and end of the timeline to trim unnecessary footage. If you want to remove the sound entirely, tap the speaker icon to mute the video. Once you're satisfied with your edits, tap "Done" to save your changes.
For more advanced editing, you might want to consider using third-party video editing apps available on the App Store. These apps offer features like adding text overlays, merging multiple recordings, or applying filters. Some popular options include iMovie (free and made by Apple), InShot, and Videoshop. These tools can help you create more polished and professional-looking screen recordings, especially if you're planning to share them on social media or use them for tutorials.
When editing gameplay footage from Iron Snout or other games, you might want to highlight specific moments or add commentary. Advanced editing apps allow you to insert arrows, circles, or text to draw attention to certain parts of the screen. This can be particularly helpful when creating game guides or showcasing strategies to other players.
To ensure your screen recordings are of the highest quality, there are several tips to keep in mind. First, make sure your iPhone has enough storage space before starting a recording. High-quality video files can be quite large, and running out of space mid-recording can be frustrating. It's also a good idea to close unnecessary background apps to free up system resources and prevent potential lag or stuttering in your recording.
Lighting plays a crucial role in the quality of your recordings, especially if you're including footage from your iPhone's camera. Ensure you're in a well-lit environment to avoid grainy or dark video. If you're recording your voice, find a quiet location to minimize background noise. Using a good-quality external microphone can significantly improve audio clarity if you're creating professional content.
When creating screen recordings for specific platforms, it's important to consider their requirements and limitations. For example, if you're planning to share your Iron Snout gameplay on social media, you might need to adjust the aspect ratio or length of your video to fit platform specifications. Instagram, for instance, has specific video length and format requirements that differ from YouTube or TikTok.
Additionally, consider the purpose of your recording. If you're creating a tutorial, you might want to slow down your actions and provide clear, step-by-step instructions. For gameplay videos, focus on showcasing your skills and interesting moments. Remember to respect copyright laws and app policies when sharing recordings, especially those containing music or content from protected sources.
Screen recording on iPhone with sound is a powerful feature that opens up a world of possibilities for content creation, troubleshooting, and sharing experiences. Whether you're capturing your high score in Iron Snout, creating a how-to guide, or preserving a memorable video call, the process is simple and accessible. With the tips and techniques outlined in this guide, you're now equipped to make the most of this feature.
As you practice screen recording, you'll discover new ways to utilize this tool in your daily life. From enhancing your gaming experience by recording and analyzing your gameplay in Iron Snout to creating engaging content for social media, the applications are vast. Remember to always respect privacy and copyright considerations when recording and sharing content.
With the ever-evolving landscape of mobile technology, screen recording capabilities on iPhones are likely to improve further. Stay updated with the latest iOS updates, as they may introduce new features or enhancements to the screen recording function. By mastering this skill, you're not only improving your technical abilities but also opening up new avenues for creativity and communication in the digital age.